There are already several excellent articles discussing the sliding door tabs technique for creating navigation elements, so why do we need another one? (For those who don't already know, sliding door tabs, originally conceived by Douglas Bowman, are navigation tabs made up of two separate background images which allows for the tabs to expand and contract when the user resizes the text in their browser.)
The original article's example featured tabs whose only change when a mouse was hovered over the link was a change of text colour. Others added a change of background-color too for a more noticeable :hover effect but the thing I found that was missing was a similar change when the links were in their :focus or :active state.
Focus for keyboard users
Changing a link's style on :focus is important for those people who do not use a mouse to navigate the web (whether through necessity because they have mobility problems, or by choice). People who use their keyboard and tab from one link to another get an immediate visual cue as to where they are just as if would if they were hovering over the link with a mouse.
The sliding door tabs technique makes use of two separate background images, one attached to the anchor and one attached to the list item containing the anchor, to achieve its 'sliding doors' effect (expanding and contracting). This is fine for :hover effects because we can attach :hover styles to most elements including list items (Internet Explorer needs a little bit of javascript help, however, as it doesn't support :hover on anything but pseudo classes).
Unfortunately, however, :focus doesn't work the same way which means we're left with a couple of different options:
- trigger the
:focususing javascript (we'd be using javascript anyway to get the:hoverto work in IE), - add an additional markup element inside the anchor to which we'd attach the second image. This way we can use the
:hoveron the anchor, which works in all situations, to change both elements' backgrounds.
Both options have disadvantages: option 2 involves using a set of tags that otherwise wouldn't be needed and option 1 will fail if javascript is disabled. (Option 1, however, will work in Opera which doesn't react to :focus on anchors in the same way that other browsers do.)
To start with, let's view the example.
So let's go through both examples in a bit more detail using the link above for reference.
I should point out a couple of things that I've done with these examples that others may not want to do. The first is to wrap each unordered list in an additional div element. You could, of course, get away with attaching your background to the ul itself (with the correct float clearing applied) but I first approached this while working on a site which had the navigation placed inside a header which also contained other elements. It's likely that this would be the case for most of uses of this type of navigation.
The other point of note is that I've used a bottom border on the containing div which has led to some complications which I'll discuss later. I could've mimicked the bottom border using a background-image as in the A List Apart example but the original design called for a different background-image on the header so that was out. (I could've added an extra element but I try to avoid doing that for the sake of a decorative image wherever possible.) I could also have used the background-color of the header as the colour of the border and then used a bottom margin on the list, but again, I wanted a different coloured border (I know, just being awkward).
All that this means is that there are alternatives for doing some aspects of this particular example that would probably involve less IE-only rules (and also for Opera in this case) and that this is by no means the definitive version.
So, with all the preamble out of the way, the images look like this:
![]()
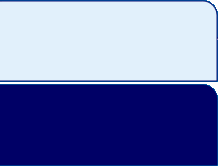
They've been made deeper than they need to be to accommodate for text size increases.
Example 1 — no extra markup with javascript
The HTML for the first example is like that of the previously-published articles:
<div class="nav-container">
  <ul id="tab-nav1" class="tab-navs">
    <li><a href="#">Link 1</a></li>
    <li id="active1"><a href="#">Link 2</a></li>
    <li><a href="#">Link 3</a></li>
    <li><a href="#">Link 4</a></li>
  </ul>
</div>
(The additional class on each ul is because there’s two examples styled the same. You’ll probably find you don’t need a class and an ID on your list.)
I’ve made nav-container position: relative so that I can use position: absolute on the ul to place it at the bottom of the header.
.nav-container {
  position: relative;
  background: #006CB1;
  border-bottom: 2px solid #006;
}

ul.tab-navs {
  position: absolute;
  list-style: none;
}
I’ve also made the list items position: relative because I’ve used that to position the active link. Following the ALA example, the list item gets a left padding equal to the width of the image (which is just wider than where the curve ends) with the background-image positioned left top and the anchor set to display: block to give it dimensions, and padding added to position the anchor text in the middle of the tab.
#tab-nav1 li {
  position: relative;
  float: left;
  margin-left: 2px;
  padding: 0 0 0 14px;
  background:url(images/tab-l-normal.gif) 0 0 no-repeat;
  text-align: center;
  border-bottom: 2px solid #006;
}

#tab-nav1 a {
  float: left;
  display: block;
  padding: 9px 22px 7px 10px;
  background:url(images/tab-r-normal.gif) 100% 0 no-repeat;
}
On :hover, the background-image is moved negatively to reveal the dark blue coloured portion.
#tab-nav1 li:hover { background-position: 0 -84px; }
#tab-nav1 li:hover a { background-position: 100% -84px; color: #FF0; }
For the active link, I’ve given it an ID and styled that with the left and right white images. I’ve also set the colour to the same for all states and changed the cursor to default so that the link doesn’t change at all on :hover and therefore doesn’t appear to be a link even though it still is. (It is thought by some that not de-linking the link for the page you are currently on is a usability error, so by doing this, although not actually turning the link off — you can still click it — you are significantly reducing the chances of people thinking it is a link.)
The list item is also moved down and the bottom border removed to make it blend in with the area below.
#tab-nav1 #active1, #tab-nav1 #active1:hover {
  border-bottom: none;
  top: 2px;
  color: #006CB1;
  background: url(images/tab-l-white.gif) 0 0 no-repeat;
}
#tab-nav1 #active1 a { color: #006CB1; background: url(images/tab-r-white.gif) 100% 0 no-repeat; }
#tab-nav1 #active1 a:hover { cursor: default; }
So far, of course, all I’ve done is recreate previous examples and the change on :focus doesn’t actually occur yet. That’s where the javascript comes in. You could write a script that alters the style of the relevant elements, e.g., this.style.backgroundPosition = "something", but as one of the main aims of CSS is to separate presentation from content, so too with javascript, the aim should be to separate behaviour from content which means rather than embedding the style changes in the javascript (which would mean the script would need to be edited as well as the CSS if changes were required in the future), a class is attached to the elements when they are hovered/focused on and that class is included in the CSS.
To accomplish this, I’ve used a script that is very similar to one you may have already come across if you are familiar with the Suckerfish Dropdowns.
function linkBg() {
  var anchors = document.getElementById("tab-nav1").getElementsByTagName("a");
    for (var j=0; j0? " ": "") + "hf";
      }
      anchor.onfocus=function() {
        this.parentNode.className+=(this.className.length>0? " ": "") + "hf";
      }
      anchor.onmouseout=function() {
        this.parentNode.className=this.className.replace(new RegExp("( ?|^)hf\\b"), "");
      }
      anchor.onblur=function() {
        this.parentNode.className=this.className.replace(new RegExp("( ?|^)hf\\b"), "");
      }
    }
  }
window.onload=linkBg;
The difference with this script, is that rather than grabbing the list item elements and attaching the class to them, the script searches for the anchors contained within the list items because they receive :hover and :focus naturally and then steps up one level in the DOM tree and applies the class to their parent element, which is the list item, using this.parentNode.
This roundabout method wouldn’t be needed if IE treated :hover and :focus on non-pseudo classes in the same way that other browsers do.
The script applies a class ‘hf‘ onmouseover and onfocus and then removes it again onmouseout and onblur. Then all that’s required is the class in the CSS to peform the chang
#tab-nav1 li.hf { background-position: 0 -84px; }
#tab-nav1 li.hf a { background-position: 100% -84px; color: #FF0; }
Example 2 – adding an extra span
<div class="nav-container2">
  <ul id="tab-nav2" class="tab-navs">
    <li><a href="#"><span>Link 1</span></a></li>
    <li id="active2"><a href="#"><span>Link 2</span></a></li>
    <li><a href="#"><span>Link 3</span></a></li>
    <li><a href="#"><span>Link 4</span></a></li>
  </ul>
</div>
The only change to the HTML is to wrap the anchor text in an extra span.
ul#tab-nav2 { left: 5px; bottom: 0; }
This example requires a slightly different placement of the list.
#tab-nav2 li { float: left; }
#tab-nav2 a, #tab-nav2 a:visited,
#tab-nav2 a:focus, #tab-nav2 a:active { color: #006CB1; text-decoration: none; }
#tab-nav2 a:hover { color: #FF0; }
Because none of the styling is applied to the list item, in this case it’s just floated left. The previous example’s text styling was all performed by the javascript, but in this example it’s in the CSS.
#tab-nav2 a span {
  display: block;
  height: 1.5em;
  padding: 9px 20px 0 12px;
  background: url(images/tab-r-normal.gif) 100% 0 no-repeat;
}

#tab-nav2 a {
  position: relative;
  float: left;
  display: block;
  height: 1.5em;
  padding: 0 2px 9px 14px;
  background: url(images/tab-l-normal.gif) 0 0 no-repeat;
}
Because the anchor is the outermost element, the background images are actually swapped around with the left image now going on the anchor. The anchor this time gets the 14px left padding to reveal the image and the other padding values are to centre the text horizontally and vertically within the tab.
#tab-nav2 a:hover { cursor: pointer; /* for IE5 you need cursor: hand; */ }
#tab-nav2 a:hover span, #tab-nav2 a:focus span, #tab-nav2 a:active span {
  background-position: 100% -84px;
}
#tab-nav2 a:hover, #tab-nav2 a:focus, #tab-nav2 a:active {
  background-position: 0 -84px;
  color: #FF0;
}
The cursor on :hover needs to be defined for IE because without it in this example it becomes a text cursor. The :hover state of the image is then pulled into place on :hover, :focus and :active states of both the anchor and the span.
#active2 a, #active2 a:hover, #active2 a:focus, #active2 a:active {
  bottom: -2px;
  color: #006CB1;
  cursor: default;
  background: url(images/tab-l-white.gif) 0 0 no-repeat;
}
#active2 a span, #active2 a:hover span,
#active2 a:focus span, #active2 a:active span {
  bottom: -2px;
  background: url(images/tab-r-white.gif) 100% 0 no-repeat;
}
For the active link in this example, it is positioned negatively to cover the bottom border and the cursor is again set to default.
As mentioned earlier, the positioning of the bottom border causes some problems, mainly in IE, but also in Opera. These are easily overcome with a few special rules contained within conditional comments for IE and with a filter for Opera and IE5 Mac.
/* IE 5 Mac style only */
/*\*//*/
#tab-nav2 a { width: 6.1em; }
/**/

<!--[if lte IE 6]>
  <style type="text/css" media="screen">
    ul#tab-nav2 { bottom: -1px; }
  </style>
<![endif]-->
<!--[if IE 6]>
  <style type="text/css" media="screen">
    ul#tab-nav1 { bottom: -3px; }
    #tab-nav2 a { width: 6.4em; padding-bottom: 0px; }
    #active2 a, #active2 a:hover { bottom: -2px; }
  </style>
<![endif]-->
<!--[if lt IE 6]>
  <style type="text/css" media="screen">
    #tab-nav2 a { width: 7.4em; padding-bottom: 0; }
    #tab-nav2 a:hover { cursor: hand; }
    #tab-nav2 a span { padding-bottom: 9px; }
    #active2 a, #active2 a:hover { bottom: -1px; }
  </style>
<![endif]-->
The IE5 Mac filter goes in the main stylesheet as that browser doesn’t understand conditional comments. After the end of the main stylesheet, there is a series of rules: one for IE5-6, one for IE6 only and one for IE<6.
Without an explicit width set, IE5-6 makes the tabs the full width of the container. IE5 needs a different width due to its broken box model. The widths are in ems to allow for resizing of the text. IE6 also has a problem with the bottom padding which IE5 doesn’t.
For the active link, IE again gets slightly different values. The surprise (for me anyway) was that Opera 8.5 had trouble with the positioning of the active link too. This is a filter only recognised by Opera:
@media all and (min-width: 0px) {
  body #active2 a, body #active2 a:hover,
  body #active2 a span, body #active2 a:hover span { bottom: 0; }
  body #active2[id^="active2"] a,
  body #active2[id^="active2"] a span { bottom: -2px; }
}
The first two rules sets a new value for Opera >= 8 and the last two reset it again for Opera 9 which doesn’t have a problem with the positioning. As mentioned earlier, nearly all the special rules presented above involve the placement of the list adjacent to the bottom border and in most cases, probably wouldn’t be required.
The finished example again.
Thanks go to Chris S for his guidance on the concepts and javascript.